Showing posts with label Posts Hacks. Show all posts

Swap Posts Titles and Blog Titles in Blogger Beta

Yes, Now you can change the Title of the blogposts on individual post-view. You might have seen that I've changed the Title of my homepage to "Blogger Templates|3 Column Templates|Blogger Widgets|Blogger Hacks." This trick can help in boosting your search engine rankings.
By default, your Blogger's title on the top left displays your blog title, and if it's in the items page, it'll include your post title as well.eg, My Blog:Change the blog title for blogposts. By copying the coding from below, you can change the default behavior of the title tag.

  • Step 1-Goto Blogger Dashboard>>Layout>>Edit Html
  • Step 2-Backup your template
  • Step 3-Follow the instructions below

Find this code in your XML template{in header}

<title><data:blog.pagetitle/></title>

Now replace it with

<!-- Start Widget-based: Changing the Blogger Title Tag -->
<b:if cond='data:blog.pageType == "item"'>
<b:section id='titleTag'>
<b:widget id='Blog2' locked='false' title='Blog Posts' type='Blog'>
<b:includable id='comments' var='post'/>
<b:includable id='postQuickEdit' var='post'/>
<b:includable id='main' var='top'><title><b:loop values='data:posts' var='post'><b:include data='post' name='post'/></b:loop> ~ <data:blog.title/></title></b:includable>
<b:includable id='backlinkDeleteIcon' var='backlink'/>
<b:includable id='feedLinksBody' var='links'/>
<b:includable id='backlinks' var='post'/>
<b:includable id='status-message'/>
<b:includable id='feedLinks'/>
<b:includable id='nextprev'/>
<b:includable id='commentDeleteIcon' var='comment'/>
<b:includable id='post' var='post'><data:post.title/></b:includable>
</b:widget>
</b:section>
<b:else/>
<title><data:blog.pageTitle/></title>
</b:if>
<!-- End Widget-based: Changing the Blogger Title Tag -->

Further more you can add a very good keyword in homepage's title by just adding Keyword + Blog Title by finding this line in the above code{3rd last}-

<b:else/>
<title><data:blog.pageTitle/></title>
</b:if>

and adding keyword here

<b:else/>
<title> <data:blog.pageTitle/>Keyword</title>
</b:if>

Be creative in writing Keyword, it will surely help your blog grow and also for search engine optimization.
I would like to thank Webtalks for sharing such a great trick with us.

[Read the rest of this entry...]

How to Add Email Link Below the Posts in Blogger

You can put your email link below your posts but it will be picked up by spam bots and then your inbox will soon be full of thousands of spam mails. It will be better to follow this method of putting it.......

First you will have to create an image out of your email link. For this go to :

Email Generator

OR

http://services.nexodyne.com/email

Follow the steps to make an image out of your email and then download it to your PC. Create an account at a freehost like Googlepages and upload the image there. Copy down the link of the uploaded image.


Login to Blogger Dasbhoard. Click on layouts for the blog where you want to add the link. Click on Edit Html tab at the top. First backup the template by clicking on Download Full Template link. Then put a check in Expanded widgets Template box and scroll down in Edit Template text box till you come to this line in Blog Posts widget :

<p class='post-footer-line post-footer-line-1'>

Paste the line below just under the code above :

<img src="URL OF UPLOADED EMAIL IMAGE" alt="my email" />

Replace the CAPS with the link of your uploaded image. Preview and save Template.

CLICKABLE EMAIL LINK


To make a clickable image link paste this code instead at the same position :

<a href="mailto:xyz@gmail.com?subject=Hello%20again"><img src="URL OF UPLOADED EMAIL IMAGE" alt="my email" /></a>

Instead of xyz@gmail.com put your own address. This method carries the risk of the address being harvested by spam bots. Save Template. Now clicking on the image will open the Compose Mail window with the address already filled in and the subject title as Hello Again.
[Read the rest of this entry...]

How to Create Expandable Posts Summaries in Blogger

Expandable Post Summaries is the method by which each blog post consists of a short paragraph of introduction followed by a 'Read More' link. This enables the reader to get a small introduction to each post on the main page. He can then click the Read More link if he gets sufficiently interested........

Many bloggers have reported confusion when they tried to follow the instructions on the official blogger help page for this hence I have tried to put the help in more easy to follow terms here. There are basically three steps to follow if you want to implement expandable post summaries in the new layouts template.

CONDITIONAL CSS


The first step is to put the code for the conditional css. This changes how posts display on different pages. To do this login to Dashboard and click on Layout for your blog. Then click on Edit Html and first backup your template by using the Download Full Template link. Then scroll down till you come to </head> tag and add the following code immediately above it :

<style>
<b:if cond='data:blog.pageType == "item"'>
span.fullpost {display:inline;}
<b:else/>
span.fullpost {display:none;}
</b:if>
</style>


Save Template. IMPORTANT NOTE in the layouts template there is a ]]></b:skin> tag just above the </head> tag. Add the above code so that it lies between these two tags. What we did here was to define a class called "fullpost" that will appear only on post pages (permalinks).

"READ MORE" LINKS


The second step is to add the Read More links which will appear after the paragraph summaries. To do this put a check in the Expand Widgets Template checkbox at the top of the Edit Template text box.
NOTE : If you do not put a check in Expand widgets template checkbox at the top of the TEMPLATE CODE BOX you will not see this code.
This is in the Edit Html subtab of Template tab. Then scroll down in the code till you come to the Blog Posts Widget code where locate this line of code :

<data:post.body/>

Add the code below immediately after the above code :

<b:if cond='data:blog.pageType != "item"'>
<a expr:href='data:post.url' target='_blank'>Read more!</a>
</b:if>


Save Template. This link will only appear on the main page and archive pages, and it will redirect your reader to the post page containing the full text of your post.
IMPORTANT NOTE : Do not use any other code or it will give error.

You can also add your Post Title at the end of the Read More link so that it will read "Read More on "My Best Post"!"

A Reader wanted to increase the font size of the Read More! link. To do this add this code instead of the one above :

<b:if cond='data:blog.pageType != "item"'>
<span ><a expr:href='data:post.url' target='_blank'><font size="120" color="red">Read more!</font></a></span>
</b:if>


Increase or decrease the figure 120 as you want it and then save the template. To make the font bold use this code instead :

<b:if cond='data:blog.pageType != "item"'>
<span style="font-weight:bold;"><a expr:href='data:post.url' target='_blank'>Read more!</a></span>
</b:if>

Save Template. To do both use this code :

<b:if cond='data:blog.pageType != "item"'>
<span style="font-weight:bold;"><span ><a expr:href='data:post.url' target='_blank'>Read more!</a></span></span>
</b:if>


Save Template.

POST MODIFICATIONS


The last step is to modify the post template so that each post when created will show you where to place your summary paragraph and where to place the rest of the post. To do this go to Settings------>Formatting and scroll down to the end of the page to the box for the Post Template. Copy and Paste the following lines there :

Here is the beginning of my post. <span class="fullpost">And here is the rest of it.</span>

Save Settings. When you click on Create Post and then Edit Html tab of Post Editor you will see the following (Click Image for larger view) :


Replace the line "Here is the beginning of my post." (Type your summary here) with your summary paragraph. Then replace the line "And here is the rest of it." (Type rest of the post here.) with the rest of your post. Do not delete the other lines <span class="fullpost"> and </span>. Also add your summary paragraph above both the lines and your rest of the post between the lines. Then click Publish to publish post.

CREATING YOUR POSTS


Login to Blogger.com and click on +New Post link on Dashboard. The Post Editor will come up. Click on Edit Html tab in top right frame of Post Editor. This is what you should see (The colors are mine) :

Type your summary here
<span class="fullpost">
Type rest of the post here
</span>

If you want to show a photo or any text on the summary post on the Main Page put it instead of the red text line.

If you want photo to show in the full post on the Post Page put it instead of the GREEN text.

Before publishing make sure that the two span (code) lines are present and the
line is at the bottom and the span=readmore line in between your summary post and the second half of the post.

Then only click on Publish button.

PLEASE NOTE


1. The hack will not apply retrospectively. That is to say after you add the code you will have to edit your past posts so that they display in summary fashion on the Main Page of the blog.


2. The hack applies only to posts on the Main Page. Once a post having the hack moves off the Main Page it does not display in this fashion. This is a Main Page Hack.

ADVANTAGES OF THIS METHOD


The advantages of this method is you get a link to your posts below your summary paragraph which gets an additional link in the search engines indexing. Also you do not have to rely on any external Javascript. The third advantage is that the Read More link opens into a new page leaving your main page still open in viewer's browser.
[Read the rest of this entry...]

How to Create a Timeline Widget for Blogger

A Timeline of your posts can be added to your beta blog. This shows the titles and links of all your posts against a horizontal scroll of dates published.........

This is an intresting way to display all the links to your posts so that your viewers get a visual impression of how prolific you have been in posting to your blog.

To do this you will have to get code from http://www.mytimelines.net/. To create one go here. Paste your feed url in the Feed URL text box. The URL of your beta blog's feed is :

http://yourblogname.blogspot.com/feeds/posts/default?alt=rss

Substitute your actual blog name instead of 'yourblogname' in above link. Next choose from four different x-axis. There are two levels of time display along the horizontal axis. You can choose Day/Month, Day/Week, Week/Month or Hour/Day. Week/Month will give you a horizontally shorter timeline with all your post titles seen vertically stashed along an incline. See Image below : Click image to enlarge it.


In the next options choose the font, width and height of your timeline. Then click the 'Get Code' button.

Code is generated for you and also a preview. If you are not satisfied with the preview you can go back to the options and modify them to get it right. The preview also serves to check whether your feed url is correct by showing you the titles of your posts.

You can scroll the timeline horizontally by placing your cursor on it. The cursor changes into a hand. Then click and drag in either direction horizontally to see other posts. Clicking on the post titles brings up a box with the title of the post and the date when it was published. Then closing this box opens this post in a new tab. To stop it opening the post click outside the box in the timeline area.

To put the code in your template go to edit Html subtab of Template tab and first backup yourtemplate using the Download Full Template link found on that page. Then scroll down in Edit Template text box till you come to :

<b:section class='main' id='main'>

Change this line to (Delete above line and add below line in its place) :

<b:section class='main' id='main' maxwidgets='3' showaddelement='yes'>

Save Template and go to Page Elements tab. There you will see a Add Page Element link above the Blog Posts section. Click this link and in popup window choose Html/Javascript option. Do not paste anything in content section as yet. Just save this element by clicking on save.

Now go to Edit Html tab and put a check in Expand Widget Templates box and then scroll down till you locate the newly added page element at the top of the Blog posts. The code will be like this :

<b:widget id='HTML14' locked='false' title='' type='HTML'>
<b:includable id='main'>
<!-- only display title if it's non-empty -->
<b:if cond='data:title != ""'>
<h2 class='title'><data:title/></h2>
</b:if>
<div class='widget-content'>


<data:content/>


</div>

<b:include name='quickedit'/>
</b:includable>
</b:widget>

Delete the line in red in the above code and add this code :

<div id='my-timeline'>
</div>

Save the template. Then go to Page Elements subtab under Template tab and click on Edit link in the Page Element created above the blog posts. In the pop up window paste the 'header' code in the contents text box and Save. It will look like this :

<script src="http://simile.mit.edu/timeline/api/timeline-api.js" type="text/javascript"></script>
<script src="http://www.mytimelines.net/js/mytimelines.v1.0.php?
u=http://the-blogger-templates.blogspot.com/feeds/posts/default?
alt=rss&s=wm&f=arial&h=250&w=550" type="text/javascript"></script>


Instead of my url in above code you will see your url.
IN ABOVE CODE COPY AND PASTE 'amp;' WITHOUT THE QUOTES AFTER EACH '&' CHARACTER OR ELSE YOU WILL GET ERROR ON SAVING TEMPLATE. YOU WILL HAVE TO DO THIS FOUR TIMES BEFORE 's','f','h'and 'w'.


Now you will have to style the page element by adding the following code in the css section of your template between the and tags :

#my-timeline {
height: 400px;
width: 500;
border: 1px solid #eaeaea;
font-size: 11px;
font-family: arial;
}

Change the width, height and font attributes to those which you had chosen on the create timeline page. Save Template. View Blog after refreshing the cache. Enjoy!
See my timeline in action at the foot of this blog.
[Read the rest of this entry...]

Most Popular Posts Widget for Blogger

If you have been blogging for some time now and have installed Google Analytics in your blog you can find out which of your blog posts attracts most visitors. You can also do this with Statcounter but it offers a limited log size. To get the full log you have to upgrade to premium version. With Google Analytics you get all information free.............

It is important to know which posts are popular for two reasons. One, if you know which topic interests your visitors the most you can write further on that topic and give more information to your visitors who will keep coming back to your blog. Secondly you can put up this list of Most Popular Posts in your sidebar so that new visitors can quickly scan the list and click on the links instead of having to search your blog.


Firstly install Google Analytics in your blog. Then after allowing some time for Google to collect data login to Google Analytics. The default page will open with a list of all your blogs which have Google Analytics installed in them. Click the down arrow next to View Reports and select your blog. In the sidebar at the bottom is a calendar with title 'Date Range'. Click the 'Enter Range' icon in the calendar bar and it will expand (see picture below )

Click on image to enlarge it.

You can change the dates in it by clicking on the arrow next to months. Enter the first date in the left calendar by clicking on date and the next date in the right calendar. Then click Apply Range at the bottom. The calendar will contract into the sidebar and the page will refresh with data between the two dates.


Then click on Arrow next to Content Optimization (under All Reports)in sidebar. It will expand down. Click on Plus sign next to Content Performance and click on Top Content in expanded column. See arrow 1 in picture below :

Click on image to enlarge it.

In the main column you will get a list of all your popular posts during the period along with their page views. If you click on the icons in the top right hand border of the main column (Arrow 2) you can download the list as a Excel, Tab separated text or XML file.


After getting the list of your Most Popular Posts you can put them in the sidebar in a Link-List or Html/Javascript Page Element.
[Read the rest of this entry...]

How to Change Posts order in Blogger

To change the order of your posts in Beta Blogger..............

remenber that posts are ordered according to "LATEST POSTED FIRST ON PAGE" rule. Hence the newest posts are first with earlier posts lower down in the order. The first post you made when you created the blog is the last on the page.

To change this order login to Dashboard. Click on Posts link after 'Manage:' under name of your blog. You will se a list of all your posts with links to Edit, View or Delete them. Click on Edit link of the post you want to change the date of. The Posts Editor opens with its two modes : Edit HTML and Compose. The second mode is present only if you have enabled it in Settings as described in Set Settings Part1. The bottom frame of the Posts Editor contains a link 'Post Options'. Click on it to expand the frame as shown in above image. (Click on image to view it better). In the expanded frame you can change the Posts Date and time.

If you want this post to be the first post always in this blog then set the date to any time as far in the future as it will allow it to be set. This is because once that day arrives and you post more posts this post will start migrating downwards like the rest. Till then it will remain a "sticky" post at the top of your blog.

This is frequently used by bloggers who wish to post a book with chapters and all in their blog and want the first post to be a "Table of Contents". To see an example see here. Also you should have Post Pages enabled by going to Settings--->Archiving.
[Read the rest of this entry...]

How to Create New Pages in Blogger

Newcomers to Blogger are confused as how to create new pages in Blogger. In a general website every page has a new link/URL. In Blogger however you do not create new pages. Instead you create new posts. A blog is an online diary where every post is dated with the date of it's creation and a timestamp. The date is at the top of the post and the timestamp at the bottom. If you create several posts in one day then the last post gets the date at the top of it.

To create new pages in Blogger we have to understand how the blog is constructed.........

BLOGGER PAGE TYPES


These are the page types in the new Blogger :

1. The Main/Home Page :

This is the page which opens when we click on the URL/link of the blog. The URL of the blog in Blogger takes this form :

http://YOURBLOGNAME.blogspot.com

where YOURBLOGNAME is the name you chose for the blog when creating the new blog. You can choose how many posts your main page can have by going to Settings----->Formatting----->Show __ posts on Main Page and save the settings. It is better to choose a smaller number of posts on the main page since it makes the blog faster to load. You can also choose to alter the appearance of this page by using conditional tags. You can choose to prevent the appearance of certain widgets by wrapping them in conditional tags.


2. The Profile Page :

This is the page which is accessed by clicking the link to your profile in the profile widget in your blog sidebar. You can choose what appears on this page by clicking Edit Profile link on your Dashboard. This page is common to all your blogs. You cannot format it. You can also choose whether to show it or not at all by checking the Share my Profile option in the Edit Profile section. If you wish to increase traffic to your blog it is better to show your profile.


3. The Post Pages :

By going to Settings------>Archives----->Enable Post Pages----->Yes----->Save Settings you give each post it's own page or URL. The page URLs have the following structure :

http://BLOG_URL/year/Month/Post-Title

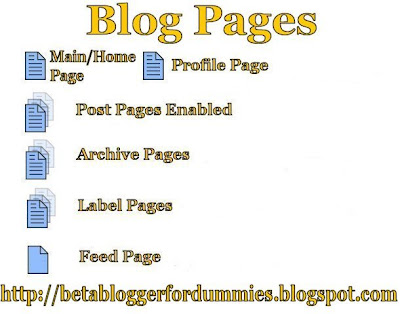
Generally blogger includes the first five words of your post title into the post URL. Make sure you include the main keywords of your post in the post title at the beginning so that they get into the post URL. This is important for search engine optimization. See picture below that shows the Blogger Pages :


To create a new page simply create a new post. You can change the appearance of post pages using conditional tags.


4. The Label Pages :

The Label Pages are created when you add labels in the bottom frame of the post editor. These are used to categorize your posts under different subjects. They serve like tags on your luggage at the airport. Do not add more than two/three labels to each post. Five or six labels on each post means five or six pages of the same content. Duplicate content is frowned on by the search engines. Each label post has the URL/link of this type :

http://Blog_URL/search/label/LABEL_NAME.

You can add labels to your sidebar using a label widget. You can also add a label cloud using the Technorati Top Tags widget.

5. The Feed Pages :

Your blog has RSS and Atom feeds. Their feed URLs are :

For the Atom feed :

http://yourblogname.blogspot.com/feeds/posts/default

For the RSS Feed :

http://yourblogname.blogspot.com/feeds/posts/default?alt=rss

For labels the feed URL is :

http://yourblogname.blogspot.com/feeds/posts/TYPE/-/LABEL

For comments the feed URL is :

http://yourblogname.blogspot.com/feeds/comments/TYPE

Substitute actual blog name in place of yourblogname and instead of 'TYPE' substitute 'full/short/default' - whatever you have chosen in Settings----->Site Feed.

Your feed footer can be changed by putting what you want to appear there in the Feed footer box at Settings----->Site Feed. If you want to customize your feed header you have to channel your blog feed through another party like Feedburner.
[Read the rest of this entry...]

How to Add an Icon/Image to Blog Posts Titles

Would you like to add a small graphic or icon to your post titles? Some members of Google Groups asked for this feature and here it is......

1. CREATE A GRAPHIC

First step is to create a graphic either in an image editor or in an online image generator such as cooltext.com. Save it to your hard disk and upload it to a freehost. Then copy down its link/URL.

2. CREATING THE IMAGE CODE


The image code is :

<img src="LINK OF YOUR IMAGE" style="border-width:0px" />

Replace the CAPS with the link of your image obtained in step 1.

3. MODIFYING THE TEMPLATE

Login to the Dashboard and click on Layout for the blog you wish to modify. Then click the Edit Html subtab of Template tab. First backup the template. Put a check in Expand Widgets Template box at the top of the template text box.


Scroll down till you come to the Blog Posts widget code. Locate this code :

<b:includable id='post' var='post'>
<div class='post hentry'>
<a expr:name='data:post.id'/>
<b:if cond='data:post.title'>
<h3 class='post-title entry-title'>
<b:if cond='data:post.link'>
<a expr:href='data:post.link'><data:post.title/></a>
<b:else/>
<b:if cond='data:post.url'>


Paste the code you created in Step2 immediately after the last line in the above code. Preview and Save Template. See picture below of the icon next to my post title

If you want it to appear after the title paste the image code after this subsequent line of code :

<data:post.title/>

Preview and save Template.
[Read the rest of this entry...]

How to Add Adsense to Beta Blogger Posts

To add Adsense Ads. to beta blogs.............

FIRST BACKUP YOUR TEMPLATE.

Then login to your Adsense account and click on Adsense Setup. Click on type of Ad. you want to setup - Content, Link unit, Search unit or Referrals.
MOST IMPORTANT LINK IN YOUR TEMPLATE SETTINGS is Download Full Template on Edit Html subtab of Template Tab.
At present you are allowed to add three Content Ads., One Link Unit, two Search units and four different Referal units per page. You should try to add Ads. so that most of them appear 'above the fold'. This is the amount of web page visible to the viewer on loading the page without having to scroll down. The best place for the Link unit is in the header as a single line containing 4-5 ad units. The right hand sidebar can hold one 'skyscraper' content unit with another in the left sidebar. This is if you have a three column template structure like this web page. The one big rectangle of content unit can go above the posts in the main column. You can add the search unit either in the posts column or in the sidebar. The referrals units can go in the sidebars at the bottom.

Follow the procedure till you come to the code for pasting in your site. Then login to Dashboard click on Layout under the name of your blog. Click on 'Add Page Element' in the sidebar and choose Html/ javascript option in the popup window. Copy the code for the Ad. from Adsense setup page and paste it into the Content area. Save changes.

To add the code in the main column of your blog. Click on 'Edit Html' Tab to open the Edit Template page. Let Expand widget templates box be unchecked. In Edit template field scroll down till you come to the code for the main column which is :

<div id="main-wrapper">
<b:section class="main" id="main" maxwidgets="1" showaddelement="no">
<b:widget id="Blog1" locked="false" title="Blog Posts" type="Blog">
</b:widget>
</b:section></div>

In the above code change maxwidgets="1" to maxwidgets="2"
Also change showaddelement="no" to showaddelement="yes"
Save Template.


Now click Page Elements tab. The Add and arrange Page Elements page opens.
Here you can now see that Blog posts section has a Add Element link. Click it to open the choices page. Choose Html/Javascript option.
CHOOSING HTML/JAVASCRIPT OPTION ENABLES YOU TO ADD CHANNEL INFO ALSO.
Copy and paste the Adsense code into the Content field. Save changes. This will place the Ad. on top of your posts. To place it below your posts go to Page Elements view and in the Blog Posts Section click and drag the Ad. to below the posts. To place one more Ad above the posts change maxwidgets="2" to maxwidgets="3" and repeat the above process. Refresh Cache. View Blog. Enjoy.


IMPORTANT ; Many readers have asked for a hack similar to Classic Blogger in which we could add Adsense Ads. within the body of the posts. louiss lim has a hack for this here. However this is done by altering part of the Adsense Ad. code which is against the TOS, so he has submitted it to Adsense for approval. Also it seems that only text Ads. can be added this way.
[Read the rest of this entry...]

How to Add Social Bookmarking Widget to Blogger Posts

Take a look at the bottom of this post. Hover your mouse over the Social Bookmarks displayed there. Do you like this hack? I thought so.

I saw this use of dynamic HTML at one of my favorite websites, Vladstudio. And reverse-engineered it to fit into Blogger Beta.

For starters, I just give you some simple instructions on how to implement this hack. Later on I'll expand on how this hack works and how to tailor it to your needs. If you want to have other services, let me know.

Implementation is easy.

Step 1: Click the Expand widget box in Edit Html Template.

Step2: Add the following code to the head of your template:

<script src='http://home.planet.nl/~hansoosting/downloads/beautifulbeta.js' type='text/javascript'/>

Step 3: Find the following line of code in your template:

<p class='post-footer-line post-footer-line-3'/>

and replace it with the code from this file (right-click and save).
Save your template and there you go!


And now for some tech stuff.
At the bottom of the post I have added a 1-row, 2-column table. The left cell contains the text, the right cell displays the icons. The text is between divs with a unique id. The id consists of the string "sbtxt" followed by the post id (data:post.id). Each icon is a link to the specified social bookmark services, and can trigger a onmouseover-event and a onmousout-event. The onmouseover event trigger a call to a javascript showsbtext-function, passing the unique id of the left text-cell, and passing a number from 1 to N, N being the total number of icons. The javascript functions looks for the specified div, and replaces its inner text with another text, such as Add to Digg. The onmouseout-event again invokes this javascript, but now by passing a value of 0 it lets the function display the standard-text.

How to tailor it to your own needs.
You can replace the icons with icons of your own choice. You have to change the links between the -tags to accomodate for that. You could also change the text that is displayed, by downloading the js-file, and changing the string-array to the values you like.
But I am sure that with this way-points layed out for you, most of you will be able to work it out.

If you need help, please let me know!
[Read the rest of this entry...]
 
AWN-Blogportant Template by FreeTemplate